f
Learning the basics and more!
GMRS/FRS in
paintball, Oiling your marker, A paintball toolkit, Hydro dates on CO2 and HPA/Nitro,
Setting up a fill station for CO2 and Air/Nitro
PAINTBALL
PISTOL HOLSTER
Why buy a cheap Nylon Holster, when you can make a better Leather Holster?
I'm sure it will fit all the handguns... PGP, Zeus, Overloard, ACP, Delta 68,
Sydarm, PGP2, PT Enforcer, Nelspot, Splatmaster
I
just purchased a PGP,
the cool older stock
class paintball pistol,
and there really is very
little available in
holsters for a paintball
handgun. I checked out
Cops911.com and it was
pretty cool, but I
wanted a good quality
leather holster, tight
fitting like for a real
gun, not just a big
pocket made out of
Nylon.
So here's what I found.
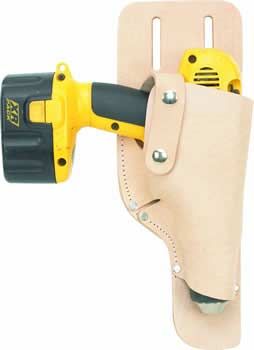
A
guy
molded a leather holster
from a power drill to
fit his laser tag gun!
Wow I could do that,
looked easy!
So that's what I did. I started with
this. A
Kuny's leather drill
holster that
I got at Home Depot for
$16.
I did a bit of
modification removing
the bottom inside rivet
so my PGP would fit,
then removed the bottom
tag of leather and sewed
up the opening in the
side I had to make for
the PGP, with a leather
sewing awl. ($10 at
walmart crafts
department)
Once done, I trimmed the
extra snap and a bit off
the top edge of the
outside.
It wasn't a bad holster
as it was sort of a
formless pouch for the
gun. The PGP fit,
but could be better, and
not molded like I really
wanted. So I soaked the
leather just as
described on the web
site. Not wanting to get
the PGP wet I vacuum
sealed it in plastic so
I wouldn't rust the
springs or anything.
Then stuffed the PGP
into the holster and
started smoothing it
down with my hands as it
dried. I also used a
heavy sock filled with
pennies to help shape
it, moving it from part
to part to really get
the contours. The
Leather was still wet,
and drying at this
point, as the article
says you should never
force it to dry with a
hair dryer or anything.
So it will likely take a
few days.
Once done, I will get
some leather dye or
sealant to make it water
proof from
tandy leather.com so it doesn't
loose it's shape if it
gets wet again.
Then a leg strap to make
it easier to draw.
probably just bootlace
leather, but we'll see.
keep you posted... it's
a work in progress
Dec/05.
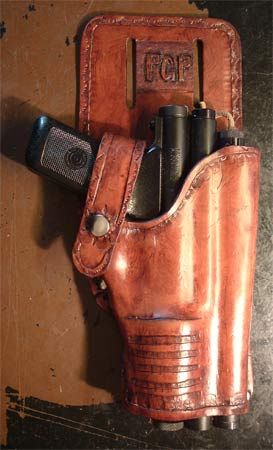
So I did a bit of
"Leather Tooling" on the
leather to make it look
cool, and trimmed
the
leather at the top so I
can actually draw
the
pistol now. (The Leather
looks a different colour
because it's dry now) So
I just need
to colour and seal the
leather.
I used a Mahogany one
step finish and colour
from Tandy Leather. It went
on really well. The
application was easy I
used some wool daubers
like they recommended, then
just buffed it to give
it a good shine.
I really like how the colour
turned out. And it is nice and
water sealed so it
shouldn't loose it's
shape when it gets damp
from playing in the
rain.
Now it's finished it's
may not 100% professional
looking, but very
personalized and
functional.
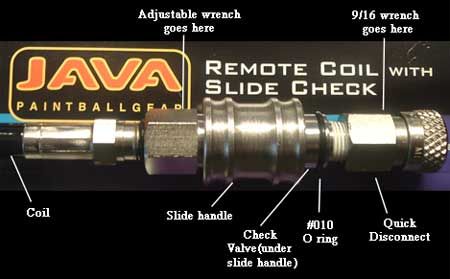
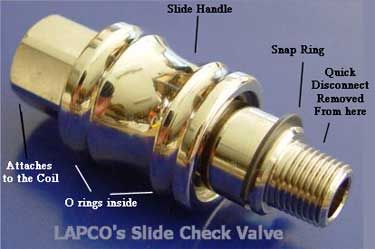
How to fix a leaking
slide check
on your remote coil in
10
easy steps.
-Evil Fingers
To stop the leak, we
need to start by removing the
Quick Disconnect to
replace the O-rings
inside the Slide Check.
We will need some simple
tools. Tools: Adjustable wrench, 9/16 open box
wrench, needle nose
pliers, Teflon Tape (aka
plumbers tape), 2
standard tank O rings (I
suggest the soft black
ones), a dental pic (a
pin or needle will
work), to remove old O
rings and the old Teflon
tape, and a small bowl
to place the removed
parts safely out of the
way.
Handy things to have on hand a few replacements
parts: an extra snap
ring (if and when the
snap ring on the Slide
check becomes lost
during removal), in the
case of the Kingman Java
slide check they use a
#010 O ring instead of
the snap ring (Order one
or two for your toolbox
in case it becomes worn
or damaged).
1:
The Quick Disconnect is
the first thing that
needs to be
removed...take the
adjustable wrench and
place on the Slide Check
and the 9/16 wrench and
place it on the Quick
Disconnect. 2:
Hold both wrenches
firmly and "counter
clock-wise turn" the
9/16 wrench on the Quick
Disconnect. 3:
Once the Quick
Disconnect has been
removed, place it in the
bowl, out of the way. 4:
Take the needle nose
pliers and slowly pull
out the "snap ring" on
the Slide Check (be very
careful when pulling the
snap ring out, it can
accidentally fly off and
get lost very easily).
Or roll off the O ring
on the Java slide. Make
sure not to rip, or
stretch it too much when
taking it off 5:
Place the snap ring
safely in the bowl, out
of the way and pull out
the Slide Check Handle. 6:
Look down into the
inside of the slide, you
will see the two
standard tank O rings,
replace both O-rings.
The dental pic makes it
easy to remove these.
Even if only one looks
worn, you may as well
save yourself some
trouble and just replace
both at the same time
anyways. 7:
After the O-rings have
been replaced, slide the
Slide Handle back on the
Check Valve, take the
snap ring and snap it
back in place, or roll
on the small O ring for
the Java slide....now
your Slide Check has
been repaired. 8:
Take the Quick
Disconnect and check the
threading if there is
any debris on it and
clean it. Again the
dental pic is handy for
removing the old Teflon
tape and dirt 9:
Wrap a small amount of
Teflon Tape around the
threading of the Quick
Disconnect (make sure to
wrap it the same
direction the quick
disconnect will be
screwing on, we want to
tighten the tape on, not
loosen it as we screw it
down.) and hand screw
the Quick Disconnect to
the matching threads of
the Slide Check. 10:
Take the adjustable
wrench and firmly hold
the Slide Check and take
the 9/16 wrench and
"clock-wise turn" and
torque the Quick
Disconnect into place. Fill up the tank and test your Slide Check
for leaks!
Setting up your own
fill station
-by SunyJim
We used to say that you should just
rent the tank, but really all that money you spend on renting, just buy a
20lb or larger tank. In the time it takes at the rental place to drop off
and pick up a new tank, you could have your own tank filled. Your only
'problem' is that you need to have the tank certified every 5 years, just
like any air tank, or any small co2 tank. Fast cheap and easy at any
welding or fire equipment location, so not really a problem at all.
A
dip-tube/siphon tank that you rent or buy will only give you about 25 12oz tanks
from a 50 lb tank, or 8-10 from a 20 lb tank.
If you do not get a siphon tank (dip-tube) people have suggested that you could just turn the big tank upside-down to get a fill. DO NOT TRY THIS!!! The sediment (rust and dirt) in the fill tank will transfer to your markers CO2 tank and from there go into your paintball marker. Which can RUIN your marker and anyone
else's marker who's bottle you fill!!! 50 lb tanks weigh 150 lbs full, so two people are required to take it to be filled. Also when you get it in place tie it to a tree or something stable so it doesn't fall over.
That's why we like
the 20lb tanks, they
are just 50lbs full,
easy for one person
to transport.
You will also need digital scale, don't try to fill without one, you risk exploding the small CO2 tanks burst disk! Wal-mart has a cheap digital fish scale, that will work in the camping/hunting department, or try a cooking place for a digital kitchen scale, make sure it reads ounces not fluid ounces when you fill. Make sure you don't unscrew the valve from the tank when you take it off the fill station, some tanks don't have enough loc-tite, and might blow off and knock someone upside the head. GET IT FIXED
IMMEDIATELY IF YOU SEE THIS HAPPENING. Empty the tank and take it to your paintball store to be fixed. This isn't a home fix it job. FULL small CO2 tanks left in a hot place like in the SUN, or the trunk of your car,
can burst a burst disk
if even a little
overfilled, so watch where you put a full tank.
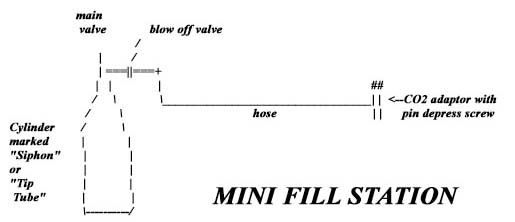
"HOW TO USE A "MINI FILL STATION" by SunyJim (A Variation of the warpig instructions)
It is extremely important that you the fill station operator
check the valve on the tank you are filling. Twist it, it should never move.
The tank can become a dangerous fast moving projectile if the valve ever comes
loose.
You need to check, that the valve does is not loose, and will not turn
when you are unscrewing the tank from the fill station.
A mini fill station consists of a blow off valve, a hose, and a CO2 tank adapter on the end of the hose.
1. Make sure bulk tank valve is closed., and the blow off valve is closed
2. Make sure your CO2 adaptor's pin depress is all the way out. (So it will not open the CO2 bottle's pin valve when the CO2 bottle is screwed on).
3. Inspect the O-Ring on your CO2 bottle. Replace
O-Ring if necessary. Attach the bottle to the CO2 adaptor by screwing it in as you would screw the bottle into a Paintball marker.
4. Screw in the CO2 adaptor's pin depress. You should hear and feel the fill station's hose charge with some of the left over air in your CO2 tank.
5. Slowly open blow off valve 6. If you have a couple of ounces of air left in your CO2 tank you will be able to cool the tank while you drain it. You CO2n encourage this by rapidly rotating the CO2 tank upside down, then right side up, etc., while blow off valve is open. Drain your bottle completely.
Do not attempt to fill a partially full bottle
(It won't actually fill, the bottle if not chilled will only take in gas, and
you will end up with about 1/3 of a full bottle. If chilled it takes in liquid
and gas) 7. If the tank is not nice and chilled, you're going to need to chill it through the following steps.
* Close blow off valve. * Open the bulk cylinder's main valve for 3 or 4 seconds then close it. This will put a few ounces of CO2 into the CO2 tank. Be careful with small tanks like 7oz as these can fill very fast. For small tanks only keep valve #1 open for 2 seconds or so.
* Go to step 5 above. 8. Now you should place the CO2 bottle on the digital scale, Zero out the scale by turning it off and back on, while the bottle is sitting on it.
9. Open the bulk cylinder's main valve Watch the scale and close the tank valve when the scale reads the bottle's capacity. That is, only fill your 7 ounce bottles to
7 ounces. Do not over fill your bottles. Over filling your bottle puts stress on your burst disk, even an ounce over will cause the burst disk to stretch slightly.
This allows the tank to be over filled without bursting the disk. The burst disk is designed to rupture and safely vent gas. If the burst disk does not rupture, the tank will explode. Which would you prefer?
[So if it does go over quickly close the main valve #1, and use the blow
off to reduce it to the tanks capacity if done immediately there should be
no harm because the tank is still cold and the extra weight has not yet
expanded from cold liquid into added gas pressure.] 10. Close the bulk cylinder's main valve.
11. Unscrew the CO2 adaptor pin depress until it is completely disengaged.
12. Open the blow off valve to drain the compressed CO2 still in the hose.
13. Unscrew your newly filled tank from the CO2 adaptor.
IN REVIEW Inspect tank
valve, check hydro date and O ring screw onto the CO2 adapter screw down the pin depress
empty remaining gas from tank. Weigh tank (Leave on scale and zero the scale)
Put 2-3 OZ in the tank then drain to chill, Fill to volume that the the bottle is listed for.
Turn off gas Back off the pin depress, Use blow off valve to release the pressure in the hose
REMOVE BOTTLE SLOWLY
MAKING SURE THE VALVE IS NOT COMING LOOSE
Oiling Your Paintball Marker
The first thing everyone should know is DON'T USE REGULAR OIL IN YOUR MARKER! Stuff like WD40 can swell the O rings and cause problems. The best thing to use is oil especially made for paintball. I use paintball oil. It's $5 a bottle and it will last a Lonnnnggg time, it's easy to find, and does a great job. You should clean and lubricate your marker after every day's play. While we are on the cleaning subject let me also say that you should clean your goggles completely after each day of play. That means getting the guck out of all the cracks, rinse the lens completely, and let it all air dry. With your marker you should completely take it apart and clean all the paint of the moving parts, the bolt, lower hammer, and any other parts your marker may have. If paint has gotten into any other nooks and crannies in your marker then you will have to further disassemble to get to it. Paint will create friction and can cause many problems if not cleaned out completely. Not cleaning it properly will cause the marker to chop paint and maybe even breakdown. After all the paint is gone you have to lube all your o-rings. Keeping o-rings lubed makes them last longer and seal better. Don't over lube them, just a drop or two, then spread it with your finger. They are also the main source of friction on your bolts so keeping them lubed will allow your marker to cycle more smoothly. At this point you can now reassemble your marker. The next thing to lube is you place 10-15 drops of oil into your markers air system adapter (ASA) putting on your CO2 tank and firing 10-20 times. Take your barrel off before you do this because you don't want oil inside it. Some markers will require a bit more TLC then others, but if you follow these few steps you should avoid a lot of common problems. See you on the field, not in the staging area.
A Paintball Toolkit Be Ready to fix your marker Here's what you need.
Get a small parts box, or tackle box with dividers and fill it with Oil O-rings small wire cutters for springs hex wrenches in imperial and metric needle nose pliers electrical tape (so handy you'll be glad you have it) a spring kit for your marker(s) spare goggle screws (especially the JT Spectras I find I loose the screws holding the bottom on if your not careful, replacements of sorts can be found at Home Depot) Loctite 242, and even better the new 243. Semi permanent thread locker, it is tool breakable, but stops screws from jiggling loose. a clean cloth to wipe off oil and dirt.
Shopping for GMRS and FRS RADIOS for Paintball
-by SunyJim
FRS
Well a lot of us are using FRS radios on the field. FRS radios are small walkie talkie radios with a 2 mile / 3.2 kilometer range,
and operate with 1/2 a watt of power. FRS stands for the Family Radio Service, and all FRS radios, no matter the cost or the brand can be used together.
The basic radios cost starts at about $15 at Walmart in London. More features add to the cost. Do not buy a FRS radio with less than 14 channels and without a headset jack. At there most expensive the radios can cost over $100 featuring built in weather radio and a rechargeable battery pack system.
14 CHANNELS WITH 38 SUBCODES.
The 38 SUB CODES increase your channels up to 532. Subcodes block out other radio communication you hear on your channel. If you are on channel 5, and another member is on channel 5 with subcode 10, you will be able to hear their conversation, but not able to talk to them. They would need to change their radio to channel 5 with 0 subcode to talk to you. It helps with busy channels to decrease the radio chatter on a channel to use the subcodes, not to conceal your communication
HEADSET Plug, wear a
headset under your mask so you can keep your hands free to use your marker.
Usually there is a single plug it will be a Motorola Standard plug and you
can use a Motorola headset, most come with a pretty good VOX capability on
the radio, If there are two plugs, earphone and microphone so you can use a
Cobra standard Headset, generally you will not have a working VOX function
and the headset you buy will have to add the function. Both headsets are available at
'The Source'
VOX, hands free. when you speak the radio broadcasts. perfect for small teams so you can keep your hands on your marker where you need them. Less effective in larger groups because of accidental activation from heavy breathing etc Make sure the radio says it has VOX, or a special headset with a little VOX box will be needed to add this feature
(like with Cobra radios).
SCRAMBLE/PRIVACY etc this is a way to actually conceal your communication. Usually the same brand and even model is required by the players using this feature to enable communication.
Motorola has refered to
this as "Eavesdrop Reducer"
CHANNEL SCAN scan for other radio communication, not as
useful as it seems, usually your opponents radio communication will mean little to you. "go to the big tree", "move forward" etc
DUAL CHANNEL WATCH this feature allows you to listen to two selected channels at once. In scenario games your general may have a channel and your commander may have a different channel. This feature allows you to listen to both.
RECHARGEABLE BATTERIES/BATTERY PACKS the radios are very good on batteries. Usually 30+ hours on a set of batteries (3 AA or 4 AAA) but a set of Nickel Metal Hydride batteries and a charger is a good idea, they last longer than normal batteries and recharge quickly (they don't get a memory like the old
rechargeable batteries) 4 AA for $15 at Walmart, charger extra. A rechargeable battery pack may be
available,
and
is well worth while as well
SunyJim's RECOMMENDATION
Having even a basic radio is better than no radio at all. a basic frs or
gmrs is less than $20 each from a big box retailer like Walmart.
As with all electronics a better brand name radio Motorola, Cobra, Kenwood, Panasonic offers better warranty durability and quality. 38 subcodes will make it more effective if you buy more than one for the family to use at amusement parks and malls, or to work in smaller groups in big games in paintball etc.
The Latest Addition to this article is GMRS. It has a longer
range than FRS. GMRS will require a
license from the FCC in the United States, FCC will require you to
use a station identification any time you use the higher power GMRS radios
and pay this license or face a fine.
More GMRS info
In
Canada GMRS radios up to 2 watts are allowed, note some higher power
radios are available in the US up to 5 watts, but they are not allowed under
the Canadian system, in Canada there is no station id and fees, just buy the
radio and use it.
Canadian GMRS info
The range is vastly superior. The radio power rather than
just 0.5 watts of FRS but instead can be 1, 2 or even up to 5 watts with a
range up to 16km or 10 miles and
the features are almost all the same as with FRS, GMRS/FRS hybrid radios typically have 22 channels
and are not allowed to include scramble features, 14
of those channels are the same as FRS. So GMRS is fully interchangeable with FRS but when two GMRS communicate the
distance can be far better. The reason I mention this is not really for paintball.
The extra distance will probably not be used with the exception of large
scenario games. But once you own FRS or GMRS radios you will find you use
them, at the mall, the amusement park etc. and the better the range, and more
subcodes you have the less likely you will hear interference on your channel
and have to switch to another channel.
FCC GMRS info
What I personally
recommend is a good
Motorola radio, I
started with a T6210
which has been small
compact and worked
amazingly well for
paintball and
everything else.
Then I attempted to
upgrade to a big 3
watt Cobra PR4000WX,
what a disaster.
Cobra really is
crap, the vox
function is not for
accessories only for
when you want to use
it sitting on a
table in front of
you hands free, the
single headset jack
is not Motorola
standard, like all
3rd party
accessories (firefox
neck mike), and the
damn radio resets
everything if on the
higher power and the
radio is shut off
for a minute. And
it's not just that
model, Cobra seems
to just be inferior
to my Motorola and
so many things just
don't work. Needless
to say I'm selling
the Cobra and I
bought another
higher model
Motorola T6250, now
an older model GMRS
but I am used to the
features on my
similar T6210, and
it's virtually
identical, just adds
weather, and higher
power. If i was
looking at a new
model I think I
would recommend a
Motorola T6510,
GMRS, weather,
vibration alert lots
of other handy
features.
GUIDE TO HPA AIR FILLING
by Doc's Machine
First off, we must assume you already have some source of HP gas, normally a SCUBA tank. For private individuals we recommend a 80 to 90 cubic foot (CF) SCUBA tank, for an inexpensive, reliable, easy to carry supply of a days air. Tanks can be bought used often as low as $100usd or less, and a good fill station retails around $60 to $90. A 90 CF SCUBA fill shouldn't cost much more than $5 to $10. When buying used tanks, be ABSOLUTELY certain the tank is in test, or currently certified to be filled to high pressures. If the tank is out of test, get a written agreement with the seller for a complete refund if the tank does not pass hydrostatic testing, before you buy it.
If your supply is capable of pressures higher than the on-gun tanks will handle, for example, a 4,500 psi source, but only a 3,000 psi system on the gun, then you should have a regulated fill station. This is a large industrial high pressure regulator with the proper fittings for filling, which, sadly, also costs about $250 to $300.
Basics of filling HPA Systems: For the most part, filling HP is easy; Often you have a gauge to watch so you can see at a glance how full the tank is, and the fill nipples are essentially automatic. There are some different systems out there, so be sure of the proper procedure before filling. For example, the PMS MiniReg has a unique cap that must be used to properly fill a Minis bottle. This cap doesn't have a check valve in the nipple, the bottles valve does that. Remember to open it before filling. Max Flows are similar; the tank has a shut off valve that must be opened before it will fill. Also remember to keep the fill nipple capped in some way. If dirt, crud or paint get in there, the next fill can and will blow it into the tank, where it will contaminate the regulator, possibly causing over pressure situations or damage. A simple rubber cap is cheap, easy and replaceable, or the new
aluminium quick disconnect covers are cool and effective.
Using the fill station: SCUBA fill stations usually have a hoop that wraps around the top of the valve, and a heavy screw with a knob to tighten it against the sealing O-ring. (There IS an O-ring in there, correct? Check that.) You don't have to lean on the knob, firm hand pressure is plenty. Nitrogen tank fill stations thread into the tank's valve, and usually have an O-ring sealing element. These often need to be 'seated' lightly using a wrench, though some have a large hand knob for tightening. Again, you don't have to lean on the wrench; if you do, something is wrong, check the O-rings or for the presence of dirt or grit.
SCUBA fill station Nitrogen fill station Once the fill station is attached and secure, make sure the bleed off valve is closed, and then attach the Guns tank. Simply attach the fill nipple on the system to the female quick-disconnect on the fill station. DO NOT allow the gun to hang from the fill connection! Always keep the gun fully supported while filling.
Connecting the system Connect the system, now, slowly crack the big tanks valve, and keep an eye on the gun-tanks pressure gauge. If the SCUBA tank is only rated to 3,000 psi and the gun tank is 3K or better, just
slowly (Do not 'Slam Fill' by opening the valve quickly, it
may damage your tank, burst a burst disk or rupture your tank) open the valve and wait for the hissing to stop. If you are filling something lower rated, for example a 1800 psi MicroReg, then VERY carefully watch the tanks pressure, and stop at the correct level.
Open the valve Crack the valve Once the correct pressure is reached, or you cant hear pressure flowing through, close the big tanks valve securely, and open the fill stations bleed valve to release the excess pressure. Disconnect the gun tank from the fill station, cap the fill nipple, and you are ready to play.
Bleed the 'station Bleed it If you have any further questions, or a unique custom setup, talk to your local field operators, store owners, or even your HP gas supplier. If you get nothing but blank stares from them, feel free to drop us a line here. We'll help the best we can.
The date on the tank was the date of the last test.
All CO2 tanks (with one
exception, see below)
must be hydrotested
every 5 years, with
unlimited lifespan. The
only exception is for
tanks under 2 inches in
diameter and less than 2
feet in length, these
are exempt from testing.
NOTE - Chrome-Alloy
tanks are NOT exempt
from testing!! (p.s.
it's not chrome-molly,
chrome-moly or chrome-olly,
it's an alloy of chrome
meaning a nickel and
other metal mixture, so
it's chrome alloy) There
is a wide belief in the
paintball
industry that they are
exempt, they are not,
unless they fall under
the 2 inch diameter
rule. The 2 inch/2 foot
rule will apply mostly
to some 9-ounce or
smaller tanks. Retesting is about $20 at your local paintball store.
The most recent addition to filling in Canada, the tanks must now have a
Transport Canada TC# stamp on them to be filled. You could fill it yourself
but not take it somewhere to be filled. Just keep that in mind before you mail
order tanks across the boarder.
Do you want to know more
about the markings on
the CO2 tanks, this link to Luxfer
has more
details on what it all
means -
LUXFER
For a better
understanding of CO2 and
why it doesn't work well
in the cold, here is the Expansion pressure chart for CO2
co2 pressure chart
HYDRO DATES FOR HPA TANKS
-Warpig
All tanks that have a DOT # on the shoulder of the tank (steel or Aluminium) and all wrapped tanks either
fibreglass or carbon have a DOT # on the label of the tank. The number looks something like this: DOT 3AL 3000 - s/n X0000 or DOT E-xxxx 3000 - X0000 usually followed by the Hydro date which looks like: 12(X0)99 This marking means December 1999Fibre wrapped tanks (usually 3000 psi) require a 3 year hydro from the date of manufacture on the label. As an example from above marking. This tank would be due now and would be retested to look like: 12(X0)02 Some models of Carbon Fiber tanks made by Carleton and Luxfer dated after 07/01 have a 5 year hydro test. ONLY SOME MODELS
It must state on the bottle if it is good for 5 year hydro or it must be
tested every 3 years. All wrapped tanks expire 15 years after date of manufacture. NO EXCEPTIONS
Aluminium or steel tanks are 5 year hydro and can be tested every 5 years until they fail. No expiration date. Price for retesting will be about $30 at the paintball store
The only exception to this rule is for steel
tanks stamped 3HT, which must be tested every 3 years and have a 24
year lifespan.
AUG - SEPT 2005 NEWS
The U.S. Department ofTransportation (DOT) recommends that any person possessing a cylinder
manufactured by Global Composites International, Inc. (GCI) and marked with
exemption number DOT-E 12695 take the cylinder to a qualified refilling
station and have the pressure relieved from the cylinder. The cylinder is no
longer authorized for use. DO NOT FILL CYLINDERS WITH THESE MARKINGS.
Refilling
stations and cylinder requalification facilities are advised that DOT-E
12695 has been suspended and these cylinders may not be refilled or
requalified
for service

 So here's what I found.
A
guy
So here's what I found.
A
guy
 extra snap and a bit off
the top edge of the
outside.
extra snap and a bit off
the top edge of the
outside.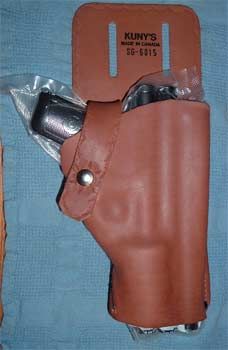 The
Leather was still wet,
and drying at this
point, as the article
says you should never
force it to dry with a
hair dryer or anything.
So it will likely take a
few days.
The
Leather was still wet,
and drying at this
point, as the article
says you should never
force it to dry with a
hair dryer or anything.
So it will likely take a
few days.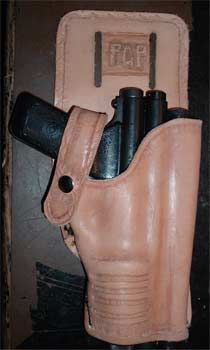